


1.Installation Method 一 Split Bricks Series
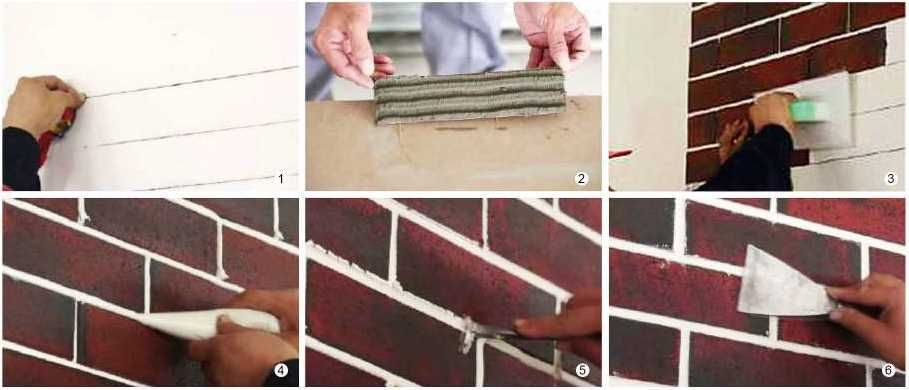
● After primary treatment, setting line for positioning.
● Use sawtooth trowel to scrape prepared BRD Flexible Tile adhesive onto the back of the tile, slurry thickness 2-3mm, full slurry ratio must be more than 80%. Please do not put too much slurry at tile edges, easy for hands to carry a nd avoid to dirty hands.
● Move up and down evenly of the tile with both hands, adjust the seam width, make the tile can uniformly contact with the wall, and tapping it with rubber plate to make the adhesive uniform. Pressing with fingers is not allowed.
● Filling, using Amulite Flexible Tile pointing agent or silicone rubber to fill all the seams.
● Pointing, when pointing agent or silicone rubber is semi-dry, use the matching pointing steel bar to pull the joints, the joints should be deep, saturated and smooth.
● Cleaning the wall surface, using shovel to eradicate the pointing agent, then use dry sponge to remove the ashes.
2.Installation Method — Stone Materials Series
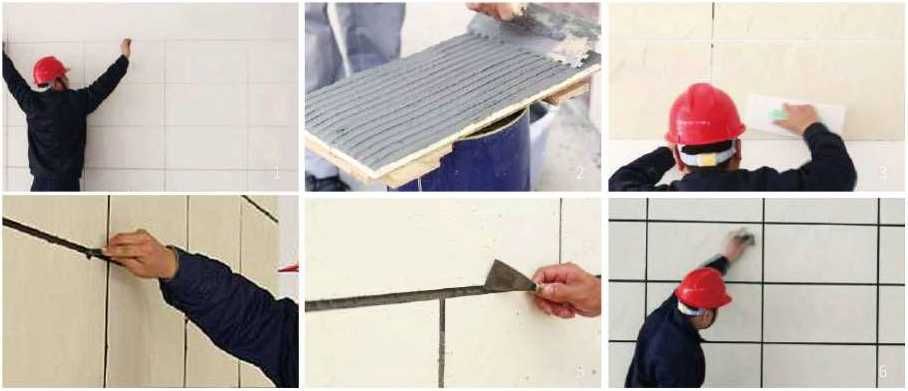
● After basic level processing, setting line for positioning.
● Use the saw tooth trowel to scrape 2-3mm thick Amulite Flexible Tile adhesive onto the wall, and the width is best within your arm length.
● Move up and down evenly of the tile with both hands, adjust the seam width, and tapping it with rubber plate to make the adhesive uniform.
● After adhesive is semi-dry, use the steel bar to point joints.
● For the overflow adhesive, when it is semi-dry, using a shovel to take it out.
● Using a dry sponge to remove the ashes.For Amulite Flexible Tile- Stone Materials Series, also can use the split brick construction method, scrape and paste on the back of the tile, and use pointing agent orsilicone rubber for joints filling.
3.Installation Method — Dermatoglyph Series
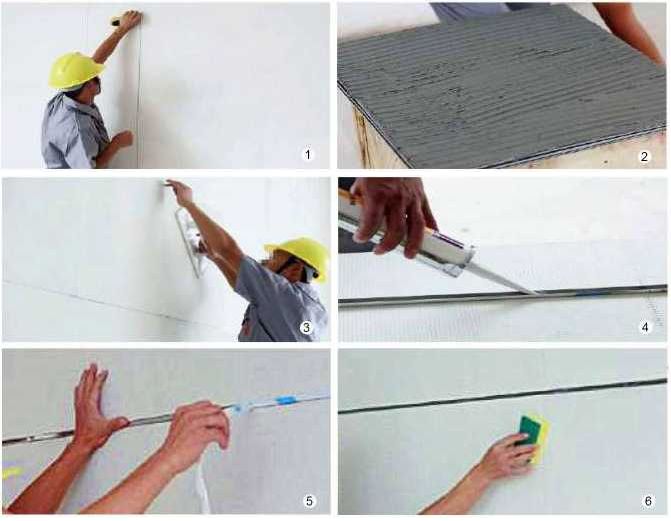
● After primary treatment, setting line for positioning.
● Use the saw tooth trowel to scrape prepared Amulite Flexible Tile adhesive onto the back of the tile, slurry thickness 2- 3mm, full slurry ratio must be more than 80%. Please do not put too much slurry at tile edges, easy for hands to carry and avoid to dirty hands.
● Move up and down evenly of the tile with both hands, adjust the seam width, make the tile can uniformly contact with the wall, and tapping it with rubber plate to make the adhesive uniform. Pressing with fingers is not allowed.
● Filling, using Amulite Flexible Tile pointing agent or silicone rubber to fill all the seams full, or after cleaning seams, use free nail glue bonding stainless steel bar to decorate the seams.
● Pointing, when pointing agent orsilicone rubber is semi-dry, use the matching pointing steel bar to pull the joints, the joints should be deep, saturated and smooth. If use the stainless steel bar, tear the surface film off after the free nail glue dried.
● Clean its surface dust with a dry sponge.
4.Installation Method 一 Wood Series
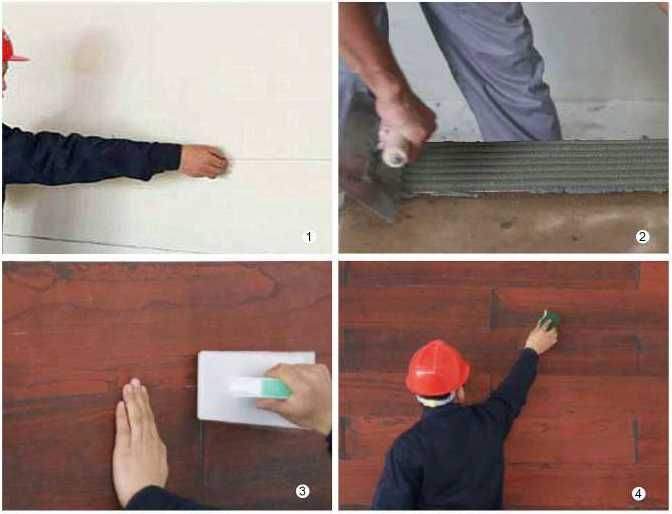
● After primary treatment, setting line for positioning.
● Use saw tooth trowel to scrape prepare Amulite oft ceramic tile adhesive onto the back of the tile, slurry thickness 2-3mm , full slurry ratio must be more than 80%, Please do not put too much slurry at tile edges, easy for hands to carry and avoid to dirty hands.
● Move up and down evenly of the tile with both hands, adjust the seam width, make the tile can uniformly contact with the wall, and tapping it with rubber plate to make the adhesive uniform. Pressing with fingers is not allowed.
● Clean joints, when the overflow adhesive is semi-dry, using a shovel to take it out.
● Clean its surface dust with a dry sponge.
Post time: Jan-05-2023